

Welcome to Behind the Effects everyone! Today we’ll be looking at hobbits, wizards
and kings that may or may not be returning.
That’s right! We’re heading to Middle Earth and Peter Jackson’s almost
legendary Lord of the Rings films.
More specifically we’ll be looking at some of the effects
used to make sure that the hobbit characters remained hobbit sized in
comparison to their surroundings, which was no easy task. Actually there were a lot of seemingly
innocuous sequences in the films, especially the first of the trilogy that, in
reality, required complex rigs to get right.

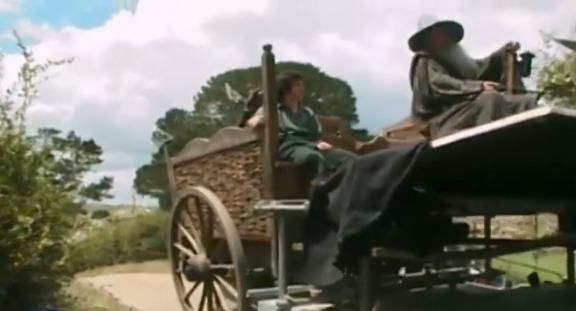
Take the scene represented in the above picture for
instance. In that scene the actor on the
left appears tiny in comparison to the bulking wizard by his side, when the two
are actually average humans who are around the same height. How is this possible? Did Rick Moranis actually build a shrink
ray? It will all be revealed as we look
further behind the effects. Watch the
full clip below and we’ll get started.
That cart might be a little mind bending when you think
about it, but that’s because the special effect behind it is a little mind
bending in and of it self. The technique
used is called forced perspective, and it creates the illusion of one person or
object being smaller than the other in a camera’s eye through distance. Here’s a few cool examples I found on
Brainjet.com.


But it was no easy task to pull this off in the wizards
wagon in Lord of the Rings. They had to
construct two wagons, a normal wagon for the normal shots and a special wagon
for the forced perspective shots. The
special wagon was setup with Frodo the hobbit’s seat being further back then
Gandalf the wizard's, but when it was shot at from a certain angle they
would appear to be just like the normal wagon. It was important for Frodo to appear to be the same distance away from the camera as Gandalf but in reality be much further away.
It might be a little difficult to tell from these set photos, but pay
attention and you’ll definitely notice the difference between the actors
positions as they film.


They had to constantly account for the varying heights of the
characters throughout the films. Often
they had two make multiples upon multiples of set items and even whole sets so
that they could appear to be bigger than or smaller than whoever was in any one
shot. It was a great strain on the team
to try and keep up with it all, especially considering the moving camera scenes.
Yup. . . they moved their cameras when doing forced
perspective shots. Why is that such a
big deal you ask? Well try it yourself
at home and you’ll realize that the second you move your camera more than just
the tiniest bit that it immediately becomes apparent that the characters are
not actually smaller than one another.
That’s why most forced perspective is done in still photography and not
film; it’s a pain in the buttocks not be
able to move your camera when shooting a motion picture.
So how was it done?
The answer is pretty complicated, but here’s the Sparknotes
version: The camera was moved on a
dolly, and that dolly was synced to a second camera-less dolly that held one of
the two characters. In the below picture
you can see a set prepared for forced perspective, but what’s hard to make out
is that Gandalf’s half of the table is actually on wheels.

Basically what happened was that they ran where everything
would have to be in order to keep the illusion in order while the camera on a computer. Then it was
programmed into a little dolly car or series of dolly cars which moved sets and
characters accordingly. So when Gandalf is
being served tea in the below picture he’s actually on the move; and having to pretend that he’s sitting
normally and not on some kind of hellish precision earthquake machine. It's a lot of work to seal up every last crack in the illusion.
This next picture shows the whole Gandalf-tea rig while it was testing. Notice the tracks that Gandalf's part of the table is on?

Pretty crazy huh? I’d
definitely recommend going back and watching these movies again with this new
special effects knowledge in mind. It’ll
probably give you a whole new appreciation for the Lord of the Rings trilogy
and the special effects implemented.
Thanks for Reading! Hope you all have a lovely Thanksgiving vacation, and i also hope you check back here later for more awesome movie stuff here on Atchley-O-Saurus Movies!
More specifically we’ll be looking at some of the effects used to make sure that the hobbit characters remained hobbit sized in comparison to their surroundings, which was no easy task. Actually there were a lot of seemingly innocuous sequences in the films, especially the first of the trilogy that, in reality, required complex rigs to get right. cheap cufflinks
ReplyDelete